Area 7
Tier 5 · bunker_00 · 7 Days to Die
Area 7 is a Tier 5 military bunker in Navezgane's far south-east desert at X 2031, Z -2479 (about 1.4 km south-east of Trader Bob), worth running in the late game if you are ready to go deep: the loot room is about 24 blocks underground at the back-left of the site.
Game stage: Late game. Tier 5 is the highest POI difficulty, and traders only offer Tier 5 quests after you have worked up through the lower tiers; Infested runs of Tier 5 buildings come later still, as Tier 6 quests.
What do you need here?
Where is Area 7?
Navezgane · fixed world-file placement
X 2031 · Y 80 · Z -2479X is east/west; Z is north/south; Y is height. This is the prefab placement, not an exact doorway. Random/custom worlds use different coordinates.
A wilderness military site: in random worlds it spawns out in the open country, away from towns.
Area 7 is a 76-block-tall prefab, and about 30 blocks of that height are below ground. In Navezgane it sits in the desert biome, about 3.2 km southeast of the map centre and about 1.4 km southeast of Trader Bob, the closest trader. Nearest other Tier 5 POIs: 7 Days Suites (~610 m northwest), Vanity Tower (~670 m north).
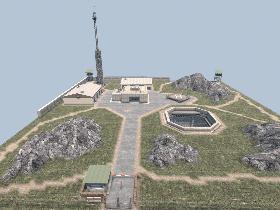
Where is the loot room in Area 7?
The loot room is about 24 blocks underground at the back-left of the site. From the quest start marker on the front edge, facing in, it is about 63 blocks ahead and 33 to the left.
- The Tier 5 hardened chest is at local (22, 6, 74), with army-truck loot, a large ammo pile, a weapons bag and a medical pile within about seven blocks.
- The Restore Power marker is on the same underground level (about 24 blocks down), nearer the middle of the site.
- Three more army-truck loot spots are at ground level near the back of the site, if you only want a quick surface sweep.
Derived from the V3.2 prefab files: container and marker offsets compared with the building footprint and the quest start marker. It is a position, not a tested route — the data does not show walls, doors or stairs, so close on the map is not always a short walk. See every container coordinate ↓
Area 7 quest types
- Clear
- Kill the sleepers across the building. The prefab defines 66 sleeper volumes (spawn zones, not a zombie count) — the 11th-highest count among the 24 Tier 5 records on GameVerity.
- Fetch
- From the quest start marker, the supply crate marker is 61 blocks ahead and 20 to the left, about 19 blocks below ground level (local (34, 11, 69)).
- Restore Power
- From the quest start marker, the power objective marker is 36 blocks ahead and 11 to the left, about 24 blocks below ground level (local (37, 6, 43)).
- Infested
- The harder version of Clear, offered as a Tier 6 quest: the V3.2 quest file sets 1.5× the normal spawns and a bigger reward. Same building, same loot room.
What to bring
- Your strongest weapon with spare ammo — Tier 5 is the highest POI difficulty in the game.
- Armour plus healing (first aid, bandages, splints) and food and water for a long clear.
- Lockpicks: the V3.2 block file marks the Tier 5 hardened chest as a locked safe (10,000 hit points if you try to break it instead).
- A light source for the bunker levels — the chest, Fetch crate and power marker are 19–24 blocks underground.
- Free inventory space, or a plan to make a second trip for the haul.
General Tier 5 preparation, not a tested loadout for this building.
Area 7 loot containers
98 matching block cells across 38 block types in the V3.2 snapshot. Multi-cell props and random helpers are included; this is not a unique-container count or item-drop table.
Container coordinates
Pick a category and a block type, then narrow by height. These are prefab-local positions, not a floor plan or a recommended route.
Bags Loot Helper
7 of 7 matching cells shown · local Y 2–71
cntBagsRandomLootHelperSelect a numbered coordinate or a dot to highlight it. Point numbers stay the same when filtering Y.
Coordinates are (X, Y, Z) offsets in the unrotated prefab, not world coordinates or floor numbers. Y separates heights; stacked dots may overlap. The plot does not show walls, stairs or a safe route.
A + marks stacked coordinates. Tapping close dots offers a choice; the numbered list always selects one exact point.
Full container inventory and coordinates (38 block types)
Army Truck Loot Helper · 5 cells
cntArmyTruckRandomLootHelper
Local X/Y/Z: (21, 6, 67) · (5, 6, 75) · (11, 30, 59) · (31, 30, 83) · (41, 30, 83)
Hardened Chest Secure Tier 5 · 1 cell
cntHardenedChestSecureT5
Local X/Y/Z: (22, 6, 74)
Ammo Pile Small · 4 cells
cntAmmoPileSmall
Local X/Y/Z: (50, 1, 22) · (36, 6, 12) · (61, 6, 60) · (13, 37, 54)
Ammo Pile Large · 1 cell
cntAmmoPileLarge
Local X/Y/Z: (22, 7, 75)
Ammo Pile Medium · 1 cell
cntAmmoPileMedium
Local X/Y/Z: (47, 13, 38)
Weapons Bag Large · 1 cell
cntWeaponsBagLarge
Local X/Y/Z: (21, 6, 75)
Pill Case Loot Helper · 7 cells
cntPillCaseRandomLootHelper
Local X/Y/Z: (93, 2, 45) · (61, 3, 2) · (61, 3, 20) · (9, 8, 47) · (85, 8, 50) · (90, 8, 50) · (92, 8, 50)
Medic Loot Pile ACorner · 4 cells
cntMedicLootPileACorner
Local X/Y/Z: (72, 1, 22) · (96, 2, 43) · (90, 7, 80) · (1, 11, 81)
Medic Loot Pile B · 3 cells
cntMedicLootPileB
Local X/Y/Z: (50, 3, 11) · (21, 7, 74) · (47, 13, 39)
Medic Loot Pile A · 1 cell
cntMedicLootPileA
Local X/Y/Z: (87, 8, 49)
Fridge Stainless Steel Loot Helper · 7 cells
cntFridgeStainlessSteelRandomLootHelper
Local X/Y/Z: (41, 1, 9) · (32, 1, 18) · (64, 1, 57) · (41, 6, 9) · (32, 6, 18) · (41, 11, 9) · (32, 11, 18)
Vending Machine 2 Loot Helper · 3 cells
cntVendingMachine2RandomLootHelper
Local X/Y/Z: (88, 2, 36) · (79, 5, 67) · (47, 6, 26)
Water Cooler Full Side Centered · 3 cells
cntWaterCoolerFullSideCentered
Local X/Y/Z: (59, 5, 62) · (61, 12, 1) · (45, 12, 35)
Vending Machine Snacks Loot Helper · 2 cells
cntVendingMachineSnacksRandomLootHelper
Local X/Y/Z: (90, 2, 36) · (79, 5, 69)
All Vending Machines Loot Helper · 1 cell
cntAllVendingMachinesRandomLootHelper
Local X/Y/Z: (49, 6, 24)
Cooler Loot Helper · 1 cell
cntCoolerRandomLootHelper
Local X/Y/Z: (53, 28, 37)
Food Pile Large · 1 cell
cntFoodPileLarge
Local X/Y/Z: (68, 2, 56)
Freezer Groceries Left Loot Helper · 1 cell
cntFreezerGroceriesLeftRandomLootHelper
Local X/Y/Z: (52, 1, 55)
Freezer Groceries Right Loot Helper · 1 cell
cntFreezerGroceriesRightRandomLootHelper
Local X/Y/Z: (52, 1, 56)
Mini Beverage Cooler Loot Helper · 1 cell
cntMiniBeverageCoolerRandomLootHelper
Local X/Y/Z: (77, 1, 27)
Water Cooler Full · 1 cell
cntWaterCoolerFull
Local X/Y/Z: (34, 30, 7)
Shipping Crate Shamway · 2 cells
cntShippingCrateShamway
Local X/Y/Z: (69, 2, 55) · (3, 7, 41)
Shipping Crate Construction Supplies · 1 cell
cntShippingCrateConstructionSupplies
Local X/Y/Z: (69, 5, 60)
Shipping Crate Lab Equipment · 1 cell
cntShippingCrateLabEquipment
Local X/Y/Z: (50, 2, 11)
Rolling Tool Box Random Loot Helper Red · 3 cells
cntRollingToolBoxRandomLootHelperRed
Local X/Y/Z: (54, 5, 74) · (90, 6, 80) · (41, 30, 89)
Tool Box Random Loot Helper Red · 3 cells
cntToolBoxRandomLootHelperRed
Local X/Y/Z: (54, 6, 75) · (83, 7, 78) · (47, 31, 84)
Workbench Busted Loot Helper · 3 cells
cntWorkbenchBustedRandomLootHelper
Local X/Y/Z: (54, 5, 72) · (46, 12, 41) · (35, 30, 89)
Utility Store Crates Loot Helper · 1 cell
cntUtilityStoreCratesRandomLootHelper
Local X/Y/Z: (58, 7, 75)
Book Shelf Single Bottom Loot Helper · 9 cells
cntBookShelfSingleBottomRandomLootHelper
Local X/Y/Z: (47, 1, 9) · (75, 1, 33) · (76, 1, 33) · (47, 6, 12) · (35, 6, 24) · (47, 11, 9) · (32, 11, 24) · (58, 12, 22) · (73, 12, 35)
Book Shelf Single Top Loot Helper · 8 cells
cntBookShelfSingleTopRandomLootHelper
Local X/Y/Z: (75, 2, 33) · (76, 2, 33) · (47, 7, 9) · (32, 7, 24) · (47, 12, 12) · (35, 12, 24) · (58, 13, 22) · (73, 13, 35)
Book Pile 01 Air Loot Helper · 1 cell
cntBookPile01AirRandomLootHelper
Local X/Y/Z: (35, 2, 22)
Bookcase Corner Poor Loot Helper · 1 cell
cntBookcaseCornerPoorRandomLootHelper
Local X/Y/Z: (59, 5, 63)
Bags Loot Helper · 7 cells
cntBagsRandomLootHelper
Local X/Y/Z: (74, 2, 40) · (67, 6, 22) · (77, 6, 33) · (5, 6, 86) · (77, 11, 76) · (38, 35, 61) · (14, 71, 84)
Luggage Medium Loot Helper · 3 cells
cntLuggageMediumRandomLootHelper
Local X/Y/Z: (82, 6, 25) · (39, 7, 49) · (39, 11, 25)
Luggage Pile B Loot Helper · 2 cells
cntLuggagePileBRandomLootHelper
Local X/Y/Z: (45, 6, 15) · (77, 11, 15)
Duffle 01 · 1 cell
cntDuffle01
Local X/Y/Z: (77, 12, 28)
Luggage Big Loot Helper · 1 cell
cntLuggageBigRandomLootHelper
Local X/Y/Z: (75, 1, 16)
Luggage Pile A Loot Helper · 1 cell
cntLuggagePileARandomLootHelper
Local X/Y/Z: (38, 1, 10)
Quest targets & fetch containers
Quest tags: Clear, Fetch, Restore Power, Infested.
Local Y 11 · one indexed height
Local coordinates
1 of 1 XML marker shown · V3.2.0
- #1X 34 · Y 11 · Z 69
These are offsets inside the unrotated prefab, not world coordinates or floor numbers. Use the active in-game quest indicator to identify your target.
What is missing from this view?
The XML index does not list every possible supplies location or tell you which target is active. The V3.2.0 source snapshot is unchanged; this display is not a new gameplay verification.
The separate loot-container scan excludes quest-random helper blocks (cntQuestRandomLootHelper). Their locations are not plotted here. We have not reconciled all candidate quest containers with these XML markers or verified how the active target is selected in-game.
Entrance, room landmarks and a tested path to the supplies are still unverified. Use this as a source reference, not a room-by-room walkthrough.
All objective and challenge markers (13 types)
Feather quest marker · 1
(14, 73, 86)
Indexed quest-resource marker; it does not promise an item drop.
Fetch quest containers · 1
(34, 11, 69)
Indexed fetch-object offsets in the prefab; this is not a loot table.
Quest rally point · 1
(38, 30, 5)
Indexed rally point used by the prefab quest flow.
Restore-power objective · 1
(37, 6, 43)
Indexed restore-power objective offset in the prefab.
Wood quest marker · 2
(95, 3, 41) · (95, 3, 44)
Indexed quest-resource marker; it does not promise an item drop.
Wood-tree quest marker · 2
(73, 8, 50) · (73, 8, 54)
Indexed quest-resource marker; it does not promise an item drop.
Challenge marker: cars · 1
(41, 30, 83)
Indexed challenge target marker; it is not a guaranteed loot source.
Challenge marker: gore · 4
(82, 2, 41) · (96, 2, 42) · (83, 2, 47) · (88, 2, 47)
Indexed challenge target marker; it is not a guaranteed loot source.
Challenge marker: mechanical parts · 2
(83, 7, 78) · (90, 6, 80)
Indexed challenge target marker; it is not a guaranteed loot source.
Challenge marker: pallets · 1
(98, 2, 23)
Indexed challenge target marker; it is not a guaranteed loot source.
Challenge marker: polymers · 1
(98, 7, 26)
Indexed challenge target marker; it is not a guaranteed loot source.
Challenge marker: sinks · 1
(98, 2, 22)
Indexed challenge target marker; it is not a guaranteed loot source.
Challenge marker: steel · 2
(88, 2, 36) · (90, 2, 36)
Indexed challenge target marker; it is not a guaranteed loot source.
Difficulty, size & sleepers
Tier 5; 100 × 76 × 100 blocks. The prefab defines 66 sleeper volumes, including 15 loot-marked volumes. A volume is a spawn region, not one zombie or one loot container.
Configured hostile groups
- Configured sleeper volumes: 66 volumes · Prefab-wide configuration
What this record does not verify
Room-by-room routes, floor screenshots, safe entry instructions and clear times still need an in-game run. Live enemies and loot rolls depend on game state. We do not label this source record as a completed walkthrough.
Area 7 FAQ
Where is the loot room in Area 7?
Underground, about 24 blocks below ground level at the back-left of the site — roughly 63 blocks in and 33 to the left from the quest start marker. The Tier 5 hardened chest sits with army-truck loot, an ammo pile, a weapons bag and a medical pile. Derived from prefab data, not a tested route.
Where is Area 7 in 7 Days to Die?
In Navezgane: X 2031, Y 80, Z -2479, in the far south-east desert, about 1.4 km south-east of Trader Bob. In random worlds it spawns in the wilderness.
What tier is Area 7?
Tier 5, the highest POI difficulty in 7 Days to Die V3.2 (from the prefab's DifficultyTier). Quest tags: Clear, Fetch, Restore Power, Infested. Traders offer the Infested version as a Tier 6 quest.
How big is Area 7?
Area 7 is 100 × 76 × 100 blocks (width × height × depth), the largest footprint class on GameVerity, with 66 sleeper volumes. About 30 blocks of that height are below ground level.
Sources & verification
GameVerity checked the XML metadata and binary prefab snapshot from public dedicated-server depot 294422, manifest 1633674551820196085. Source manifest: 2026-08-28. Container recheck: 2026-11-02.
Snapshot hashes (SHA-256)
- blocksSha256
- 5c015b0cddef790a959e5e29e123a3688fb7a96093867526e2f34b25d2a5473a
- ttsSha256
- 9e9b7193b932772958ccb3b3dd75e43fdc8dc2a2f3e286db425cdb76bdafdf52
- xmlSha256
- ec5b5660102ddd01b565e2352c46d626aad83889ac17ba1ec228e88e29baad20
Version & correction history
— Page added from the V3.2.0 prefab, block, quest and Navezgane world files. Loot-room, quest and location notes are derived from those files; no in-game run is claimed.
V3.2.0 baseline: core prefab facts checked 2026-11-02. No earlier-version comparison is claimed.
View the version record →